According to a recent survey, more than 80% of the organization will move to cloud solutions by next year. It is the approach to go for any small or large enterprise hoping to stay refreshed with the present innovation. Many Organizations still have their Outlook data saved on their nearby machines. These need to be uploaded to the new Microsoft cloud servers for continued work. Heads search for answers to import PST to Office 365 through various ways. One such manual procedure has been discussed in this post. It clarifies the network upload method that sends data files directly to MS Offices 365 after having saved them to hard drives. It is an easy and swift method. Keep reading to find out more.
Steps To Import PST to Office 365 Using Network Upload
Listed here is a stepwise guide to perform the complete task manually:
Step 1: Copy the SAS URL and install Azure AzCopy
- Go to https://protection.office.com and sign in using the credentials for an administrator account in your Office 365 organization.
- In the left pane of the Security & Compliance Center, click Data governance > Import.
- On the Import page, click Add Icon New import job.
- Type a name for the PST import job, and then click Next. Utilize lowercase letters, numbers, hyphens, and underscores. You cannot use uppercase letters or include spaces in the name.
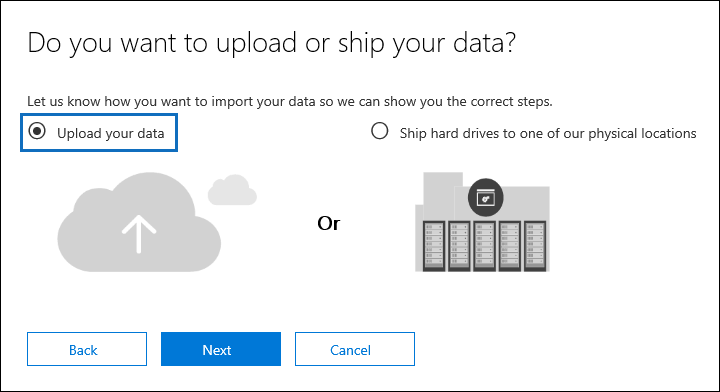
- On the Do you want to transfer or move data? page, click Upload your data and then click Next.
- On the Import data page, do the following two things:

1. In step 2, Tap on Show network upload SAS URL. After the SAS URL is displayed, click Copy to clipboard and then paste it and save it to a file so you can access it later.
2. In step 3, tap on Download Azure AzCopy to download and install the Azure AzCopy tool. As already stated, version 7.1.0 will be downloaded. In the pop-up Wizard, click Run to install AzCopy.
- Import data page can be leave open (until you need to copy the SAS URL again) or click Cancel to close it.
Step 2: Upload your PST files to Office 365
- Run the AzureAzcopy tool. Make sure that your pst file is located on file server in your organization
Step 3: Preview your PST files uploaded to Office 365
As an optional step, you can install and use the Microsoft Azure Storage Explorer to view the PST files.
Step 4: Create the PST Import mapping file
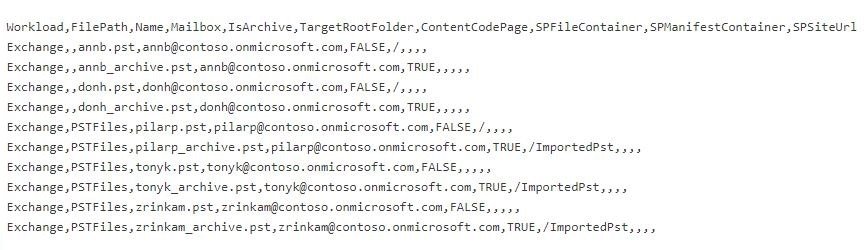
- Download a copy of the PST Import mapping file.
- Open or save the CSV file to your local pc or machine. Here you can see the example of the PST Import mapping file.You can easily the CSV file by using the Microsoft Excel.
Step 5: Create a PST Import job in Office 365
- Go to https://protection.office.com and login in using the credentials for an admin account.
- In the left side of the Security & Compliance Wizard, Click Data Management and then click Import.
- On the Import Page Click + New Import Job.
- Mention the name for the Job and then click Next.
- On the Do you want to upload or ship data? Wizard, Click Upload your data and then Click Next.

- On the Import Data Page, click the I’m done uploading my files and I have access to the mapping file check boxes and then click Next.

- On the Selecting the mapping file page, Click Select mapping file to submit the mapping file.
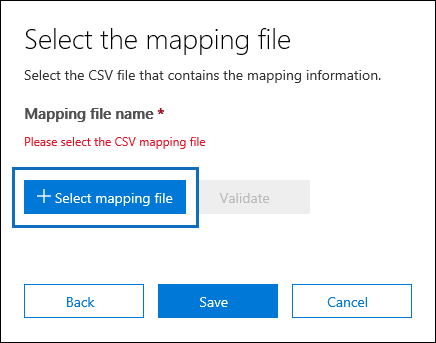
- Click Validate to check your CSV or mapping file errors.

- Click Save to submit the import job and close it after the job is created.
Step 6: Filter data and start your PST Import job
- On the Import page in the Security & Compliance Wizard, click Ready.
- On the flyout page, click Import to Office 365.
An Alternate Choice to Upload PST to Office 365
It can take longer period of time by microsoft center teams to respond and transfer data. Companies that have small budget to spend are in search of faster and efficient solutions. One of the reliable and easy solution is the SysTools Office 365 Import. It is more convient than opting for any manual technique. It can Import multiple Outlook PST files to Office 365 User or Admin Account. It supports all available versions of Windows 10/8.1/8/7/XP/7 for 32 or 64-bit machines.


Thanks for sharing the article, I used the manual way for migrating the Outlook PST file data to Office 365 Exchange Online. And it’s a little bit hard and time-consuming. So I try a new third-party solution named A2Z Migrations for PST to Office 365 and it makes my conversion so easy and simple.